Can you convert a Tomberlin E-Merge to lithium?
Yes. A compatible 48V lead-acid Tomberlin E-Merge can be converted with a matched Fleet Lithium 51.2V battery system, lithium charger, mounting kit and correctly connected vehicle controls. Choose 65Ah, 105Ah, 168Ah or a paired 210Ah configuration. Confirm your actual voltage and battery chemistry first; this guide does not cover 72V or factory EVOLVE lithium systems.
Your Tomberlin should be ready for the next trip, not another afternoon of battery watering. A correctly matched lithium conversion simplifies routine battery care and gives you useful state-of-charge information. This guide helps you choose the right capacity, understand the differences between E-Merge versions and prepare for a sound installation.
Start with your exact Tomberlin, not just its badge
This guide applies to confirmed factory 48V lead-acid E-Merge vehicles with the matching Fleet kit. That includes applicable legacy E2, E4 and E6 configurations, plus the lead-acid versions of Shadowhawk, LXR and SE. Check the model/year label, controller, charger and original battery bank before buying.
Tomberlin's 2021 E-Merge operator manual documents both six 8V and eight 6V batteries for 48V configurations. The same vehicle family also includes different drive-system ratings, so count the complete bank and read the labels. Six batteries do not automatically mean 36V.
Current Shadowhawk specifications list a 48V eight-6V system, a Sevcon AC controller and an optional EVOLVE lithium battery. The LXR and SE also need their actual battery configuration checked. An optional factory lithium system changes the replacement job.
Factory EVOLVE lithium, 72V vehicles and Engage/Ghosthawk systems are outside this lead-acid conversion guide. Send Fleet the model/serial label, battery photos, controller and charger labels for the correct system-specific help. Do not assume matching nominal voltage means matching communications or wiring.
Why choose Fleet Lithium for your E-Merge?
- Less routine battery maintenance. LiFePO4 removes electrolyte top-ups and lead-acid equalization from your charging routine.
- A capacity choice for your day. Choose useful energy reserve for neighborhood trips, golf, passengers and hills.
- A matched charging system. The kit pairs the battery with the listed lithium charger and vehicle mounting components.
- Better battery visibility. Use the matched digital SOC display and supported Bluetooth monitoring instead of relying on an old lead-acid voltage gauge.
- Help from Fleet. Keep your order, serial numbers and installation photos ready for technical support. Review the current warranty terms for your selected battery.
Secure mounting, protected cables and correct charging still matter. The upgrade changes your battery system; it does not increase the vehicle's approved seating, load, towing or speed limits.
65Ah, 105Ah, 168Ah or 210Ah?
| Capacity | Configuration | Nominal energy | Choose it for |
|---|---|---|---|
| 65Ah | One pack | 3.33 kWh | Confirmed stock motor/controller vehicles with modest energy needs. |
| 105Ah | One pack | 5.38 kWh | Everyday driving with regular charging opportunities. |
| 168Ah | One pack | 8.60 kWh | More reserve between charges in a single-pack system. |
| 210Ah | Two matched 105Ah packs in parallel | 10.75 kWh | The greatest capacity in this kit range. |
Nominal energy = 51.2V × Ah ÷ 1,000. These figures describe stored energy, not a guaranteed driving range or usable-energy rating.
The 168Ah system carries 60% more nominal energy than 105Ah; the paired 210Ah system carries twice as much. Passengers, hills, tire size, speed, temperature and accessories affect energy use. Choose a reserve for your return trip rather than relying on an ideal maximum-mileage claim. Modified motors or controllers need a specific compatibility check; the 65Ah option is for stock configurations.
What comes in the Tomberlin conversion kit?
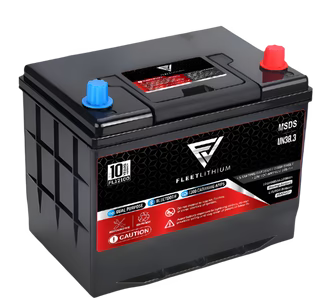
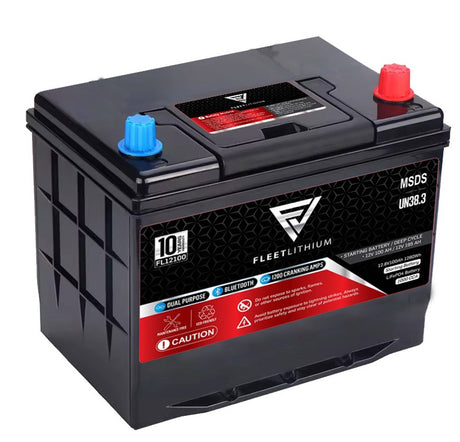
The main Fleet Tomberlin E-Merge bundle lists the selected 51V NexGen LiFePO4 battery configuration, CH5618 58.4V/18A charger, BR5139 mounting kit, AC0219 AC inlet, CB0917 main cable set and digital SOC display. Match the delivered mounting parts and hardware to the exact model-specific order.
Before dismantling the vehicle, check cable reach, mounting instructions, terminal torque and charger-removal wiring. For 210Ah, confirm the approved parallel harness, branch protection and pack-matching procedure. An accessory converter is a separate verification: retain the original only when its input range covers the new system's full charging voltage and its output capacity supports the connected loads.
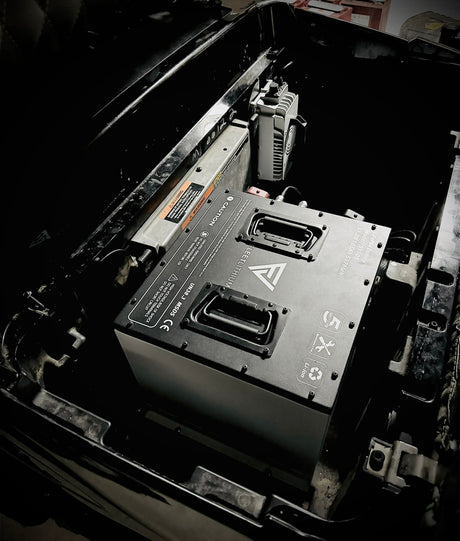
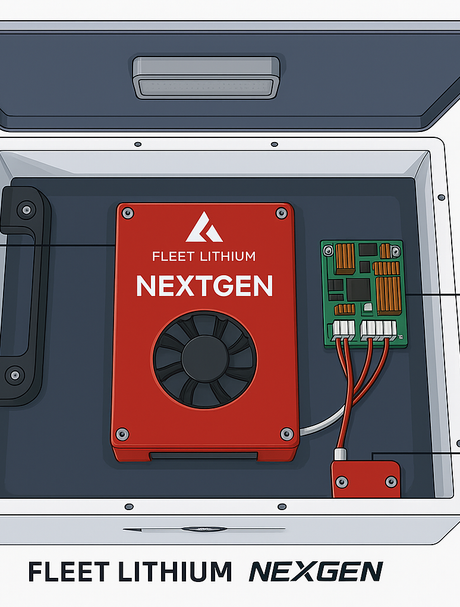
Inside a real Fleet Tomberlin installation

What you are looking at
The battery: the visible label identifies a Fleet 51105 pack, rated 51.2V and 105Ah. Check the label on your own pack before choosing its installation instructions.
The charger: the fan-cooled charger sits below the battery in this view. Your charger needs secure mounting, ventilation and protected cable routing.
The vehicle controls: the Run/Tow switch is visible beside the battery. Use your vehicle's specified service-isolation position and sequence.
The installation stage: the power cables are disconnected and the terminal covers are not fitted. This is a placement reference, not a finished wiring example. Complete the connections, torque, covers and commissioning checks before use.
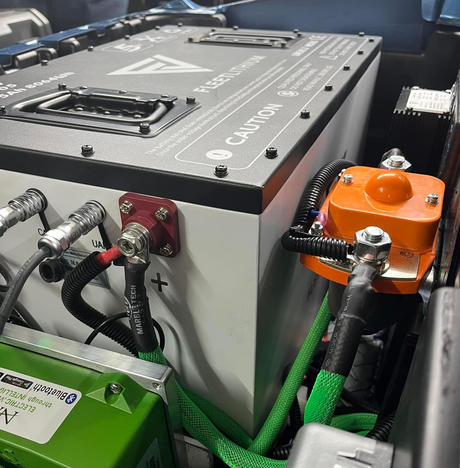
Wiring details from this installation


The kit eliminates the original charger interlock. Keep the key OFF while charging, then unplug and stow the cord before key ON.
This photo shows one legacy 105Ah installation. Your battery enclosure, mounting hardware and vehicle layout may differ. Use the instructions supplied for your exact kit.
Tomberlin lithium installation: the sequence that matters
1. Photograph, label and isolate
Park level, set the parking brake, chock the wheels, turn the key OFF and disconnect external charging power. Photograph every original connection. Label traction cables, charger wiring, converter feeds, small control wires and battery taps. Follow the exact vehicle service-isolation procedure. Some E-Merge switches have a center maintenance position; do not assume Tow means maintenance. Key OFF alone does not isolate the battery bank.
2. Remove the bank and prepare the support
Use terminal protection, insulated tools, suitable lifting equipment and the vehicle removal procedure. Every lead-acid battery remains an energy source. Keep removed batteries upright and arrange proper recycling. Clean and inspect the tray, then repair corrosion or damage before installing the restraint.
3. Secure the Fleet battery and connect identified circuits
Trial fit the battery upright and check seat, body and moving-part clearances. Follow the supplied bracket instructions; do not drill frame rails or modify the battery case. Keep the new battery OFF during wiring. Verify polarity, retain required protection and use the specified terminal torque and covers. Do not guess the destination of a small wire that previously used an intermediate battery post.
4. Preserve accessory, steering and brake functions
Identify the DC-DC converter input, enable and output connections. A 12V accessory must not receive full battery voltage. Check power steering and electric parking-brake feeds against the exact schematic; they are not automatically part of the lighting circuit. Confirm the installed controller and approved settings rather than assuming all E-Merge vehicles use the same controller.
5. Install the matched charger and display
Mount the charger in a protected, ventilated location and secure the inlet and strain relief. Remove or isolate the old lead-acid charging path. Connect the supplied SOC display to its identified battery port. The installation manual includes the legacy Delta-Q charger-removal arrangement documented in Fleet's installation reference; it must not be applied to an unidentified harness.
6. Charge, test and record
Complete the pre-power checks, restore power in the specified sequence and check battery, accessory and vehicle status. Complete a normal full charge. Unplug and stow the cord, then perform a short, low-speed test in a clear area. Reinspect for heat, rubbing or battery movement. Record torque values, component identities and results on the manual's fillable final page.
The charging change every Tomberlin owner needs to know
The current Fleet Tomberlin kit eliminates the original charger drive interlock. Your vehicle may move while the charge cord is connected. Keep the key OFF while charging. Disconnect and stow the AC cord before turning the key ON, and explain this routine to everyone who drives the vehicle.
Use the matched lithium charger. Delta-Q's charging guidance warns against applying lead-acid algorithms to lithium batteries. Do not reuse the old charger simply because its voltage label looks familiar.
At 18A, ideal empty-to-full calculations are about 3.6 hours for 65Ah, 5.8 hours for 105Ah, 9.3 hours for 168Ah and 11.7 hours for the complete 210Ah system. Balancing, charge taper, heating and accessory loads can extend those times. Use the actual charger completion indication, not a timer.
Download your Tomberlin installation manual
The Fleet manual brings the kit check, original-bank diagrams, mounting sequence, accessory circuits, parallel-pack arrangement, charger-removal guidance and first-use checks into one document. It includes a fillable installation record you can save or print.
Revision 1.2 · FL-IM-TOM-48 · October 9, 2026. Use with the instructions supplied for your exact vehicle, battery and mounting kit.
Tomberlin lithium conversion questions
Can I convert my Tomberlin E-Merge to lithium?
Yes, a compatible factory 48V lead-acid E-Merge can use a correctly matched Fleet 51.2V LiFePO4 conversion kit. Confirm your model, year, battery chemistry, controller and mounting before ordering. This guide excludes 72V and factory EVOLVE lithium systems.
Does an E-Merge have six or eight lead-acid batteries?
Both arrangements appear in Tomberlin documentation: six 8V or eight 6V batteries in series make 48V. Read the battery labels and count the whole bank. Do not choose a kit from the battery count alone.
Does the Fleet Tomberlin kit retain the charger interlock?
No. The current Fleet Tomberlin kit eliminates the original charger interlock. The vehicle may move while plugged in. Keep the key OFF while charging, then disconnect and stow the AC cord before turning the key ON.
Can I use the original Delta-Q lead-acid charger?
Use the matched CH5618 58.4V, 18A lithium charger supplied for this kit. Do not charge the Fleet battery using the old lead-acid charging profile. Document the original charger control connections before removal.
Is every Tomberlin E-Merge controller a Curtis controller?
No. Tomberlin drive systems vary by model and year; current E-Merge specifications include Sevcon AC controllers. Confirm the installed controller label and approved battery interface. Do not apply a universal no-programming claim.
Which Fleet capacity should I choose?
65Ah is for confirmed stock motor/controller vehicles. 105Ah and 168Ah provide more nominal energy in a single pack. The 210Ah option uses two matched 105Ah packs in parallel. Choose reserve for your passengers, terrain, accessories and charging schedule; capacity is not a speed upgrade.
Will this guide work for an Engage Ghosthawk or an EVOLVE battery?
No. Factory EVOLVE lithium replacement and Engage/Ghosthawk systems require their own compatibility and communications instructions. A 48V badge alone does not make the lead-acid conversion procedure applicable.
How long does a Tomberlin lithium conversion take?
Plan around the condition of your vehicle, battery removal, mounting, charger-removal wiring and testing. There is no reliable universal 30-to-60-minute promise. Resolve the electrical configuration before scheduling the work.
Ready to upgrade your E-Merge?
Choose your capacity, confirm the actual vehicle configuration and get the matched Fleet system ready before the old bank comes out. Need help identifying your setup? Send the battery, controller and charger labels along with your model and year.