Can you convert an E-Z-GO RXV to lithium?
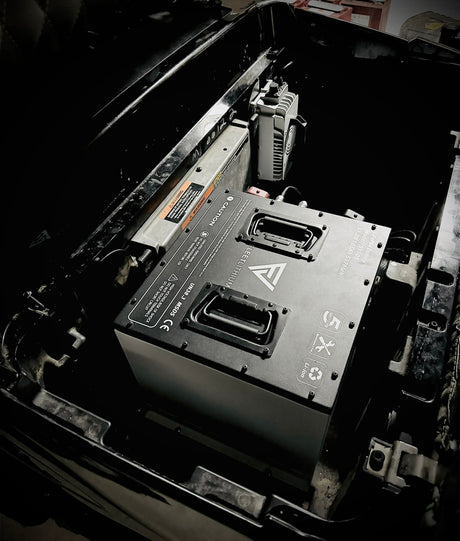
Yes. A compatible 48V lead-acid RXV or Freedom RXV can be converted with a matched Fleet Lithium 51.2V battery system, RXV mounting kit, lithium charger and SOC display. Start by identifying the actual battery tray and controller. The RXV’s electric parking brake and charger interlock are essential parts of the installation.
Your RXV should be ready for the next round, neighborhood trip or day around the property. A Fleet conversion replaces the lead-acid bank with a coordinated lithium system, eliminates battery watering and gives you capacity choices for the way you drive. This guide helps you choose the right kit and understand the installation before you buy or open the battery bay.
Start with your RXV’s actual battery bank
Lead-acid RXVs can have four 12V batteries or six 8V batteries connected in series. Both total 48V, but their trays and restraints differ. Read the labels, count every battery and photograph the complete bay. Do not choose the bracket from the model year alone.
| Original arrangement | Fleet mounting kit | What to confirm |
|---|---|---|
| Four 12V batteries / plastic tray | BR4402-R12 | Tray shape, support points, pack size and seat clearance |
| Six 8V batteries / metal tray | BR4402-R8 | Tray condition, restraint arrangement and selected pack count |
The main Fleet RXV listing covers the 2008–2022 application range, subject to matching the actual equipment. This guide covers compatible 48V lead-acid conversions. Factory ELiTE lithium, TXT, gas vehicles and the separate 2026 RXV 2 / RXV 4 application are outside its scope.
Check the controller and the structure behind the batteries
RXVs can have Danaher or Curtis controllers, or aftermarket equipment. Photograph the controller label, solenoid, resistor shield and original brake wiring. An upgraded controller or larger tires can change current demand; more amp-hours alone do not prove electrical compatibility.

Which Fleet capacity fits your driving?
Choose reserve around your normal distance, hills, passenger load and charging opportunities. The Fleet RXV conversion kit offers four configurations:
| Capacity | Configuration | Nominal energy |
|---|---|---|
| 65Ah | Single pack; stock motor/controller and approved load | 3.33 kWh |
| 105Ah | Single pack; everyday trips with regular charging | 5.38 kWh |
| 168Ah | More reserve in one pack | 8.60 kWh |
| 210Ah | Two matched 105Ah packs in an approved parallel system | 10.75 kWh |
Energy = 51.2V × Ah ÷ 1,000. Nominal energy is not guaranteed usable energy or range. Terrain, speed, passengers, tires, temperature and accessories affect distance. Your cart’s rated speed and load limits remain the same.
What comes with the RXV kit?
The listing includes the selected Fleet 51V battery configuration, CH5618 58.4V / 18A lithium charger, the matching R12 or R8 RXV mounting kit, AC0219 AC connector, CB0917 35.4-inch cables, digital SOC gauge and mounting hardware. Check the delivered packing list and have the fitting instructions and matched RXV charge-inhibit interface before removing the original equipment.
Get the right kit before you start
Send Fleet your RXV model/serial plate, controller label and complete battery-bay photos. Tell us about hills, passenger loads, larger tires and any controller upgrade so we can help match the system to your cart.
How the RXV lithium installation works
The PDF gives the detailed sequence, original diagrams and installation record. Use it with your vehicle and delivered component instructions. Electrical work requires the appropriate training, insulated tools, eye protection and safe battery lifting equipment.
- Secure the RXV. Park on level ground, key OFF, disconnect charging power and chock the wheels before selecting TOW.
- Photograph and label the bank. Identify MAIN +, MAIN −, charging power, accessory feeds and small control leads. Disconnect and insulate main negative first, then main positive.
- Remove the correct restraint. The four-12V arrangement uses its strap, hold-down and J-bolts. The six-8V arrangement has a retainer/J-bolts and separate hold-down fasteners. Remove the bank with suitable lifting equipment.
- Inspect and mount. Clean and dry the bay, repair weak structure and trial-fit the correct RXV bracket. Check the controller shield, ventilation, cable reach and closed-seat clearance. Follow the supplied fastening arrangement.
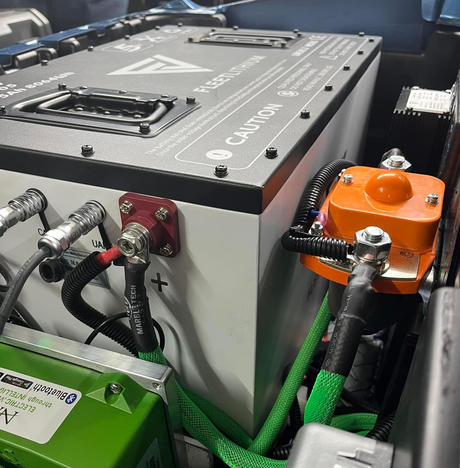
- Reconnect the right circuits. With the battery OFF, connect verified positive circuits first and negative last. Retain original brake and controller circuits. Keep 12V loads on a compatible converter, never directly on the pack.
- Install charging and SOC monitoring. Fit the matched lithium charger, AC inlet, RXV inhibit interface and Fleet gauge. DISPLAY/SOC and COM/GPS serve different purposes.
- Commission before normal use. Wait at least 30 seconds after restoring battery power before selecting RUN or operating the key. Verify charging and drive inhibition, complete the first charge, then test forward/reverse and both braking functions at walking speed.
The 210Ah configuration stays at 51.2V
The two 105Ah packs connect in parallel: positive to positive and negative to negative, using the approved dual kit, protection and balanced cable arrangement. Complete Fleet’s pack-matching procedure before joining them. Never recreate the old lead-acid series bank: two 51.2V packs in series would produce 102.4V nominal. Isolate both packs for service.
The RXV interlock and electric brake deserve their own checks
Charging power and drive inhibition are separate functions
The original RXV receptacle helps prevent driving while charging. When replacing it, trace the control circuit and connect the matched interface for the actual controller and charger. An AC inlet alone does not establish this function. If the dash works but the cart will not move, inspect the interlock and fault information rather than bridging a wire to battery positive.
Protect the electric parking-brake function
Chock the cart before changing RUN/TOW modes, and retain the original brake wiring. Do not leave an emergency brake-release bypass connected. During commissioning, verify service braking and automatic parking-brake hold. Stop for unexpected braking or a BMS trip; repeated resets are not a repair.
Account for regenerative braking and 12V accessories
Regenerative braking returns energy to the battery. Confirm compatibility with the selected pack, including at high SOC, and begin testing on level ground. The original 12V converter may stay only when its complete input range accepts the new system through 58.4V and its output, condition, load and enable wiring are suitable. Remove old single-battery accessory taps.
Keep the steps beside your cart
Download the RXV / Freedom RXV installation manual
The manual includes both bank layouts, RXV removal steps, original power and parallel-system drawings, charging and interlock guidance, brake testing, troubleshooting and a fillable installation record.
FL-IM-RXV-48 · Revision 1.1 · October 9, 2026 · Compatible 48V lead-acid applications.
E-Z-GO RXV lithium conversion questions
Can you convert an E-Z-GO RXV to lithium?
Yes. A confirmed compatible 48V lead-acid RXV or Freedom RXV can use a matched Fleet 51.2V nominal LiFePO4 system. Identify the actual tray, controller, 12V converter and charging interface first. Factory ELiTE lithium replacement is a different application.
Does an RXV use four 12V batteries or six 8V batteries?
Both lead-acid arrangements exist. Four 12V batteries or six 8V batteries in series make a nominal 48V bank. Read every battery label and inspect the actual tray; model year alone is not enough to choose a mounting kit.
Which Fleet bracket fits my RXV?
The RXV kit lists BR4402-R12 for the four-12V plastic tray and BR4402-R8 for the six-8V metal tray. Confirm the physical tray, selected battery size and pack count with Fleet. Follow the fitting instructions supplied with that bracket.
Why is a 51V lithium battery used in a 48V RXV?
Fleet 51V identifies a 51.2V nominal LiFePO4 system offered for compatible 48V vehicles. The matched CH5618 charger is rated 58.4V DC and 18A. The complete voltage range and current demand must suit the vehicle components.
Can I keep the original RXV charger?
Use the lithium charger matched to your Fleet battery. Do not reuse a lead-acid charger unless Fleet has approved its exact model and lithium profile. Preserve the RXV charge-drive interlock with the matched controller and charger interface; the AC inlet alone does not provide that interface.
Why will my RXV not move after a lithium conversion?
First disconnect AC, select RUN and release the accelerator before key-on. Check BMS and controller faults and the RXV charger-inhibit interface. A disconnected or incorrectly wired inhibit circuit can prevent driving. Do not bypass it or alter the electric-brake wiring.
Does the RXV controller need programming for lithium?
There is no universal answer across Danaher, Curtis and aftermarket controllers. Confirm voltage limits, current demand, regenerative braking and the charging interface for the selected Fleet pack. Do not copy another battery brand's settings.
Is the 210Ah RXV kit connected in series?
No. It uses two matched 51.2V 105Ah packs in an approved parallel configuration. Capacity becomes 210Ah while voltage stays 51.2V nominal. Use the specified pack-matching procedure, balanced wiring, protection and dual mounts. Never put these packs in series.
Will the factory RXV battery gauge read lithium correctly?
Do not assume the original lead-acid gauge is accurate after conversion. Use the matching Fleet SOC display or supported battery app, while retaining original dashboard wiring needed for vehicle functions. Connect the Fleet gauge to DISPLAY/SOC, not COM/GPS.
Where can I download the RXV installation manual?
Download the Fleet Lithium E-Z-GO RXV / Freedom RXV 48V Installation Manual from this guide or the Fleet Downloads page. It includes bank identification, removal, mounting, wiring, charge interlock, commissioning, troubleshooting and a fillable installation record.
Build your RXV upgrade around the right Fleet kit
Choose the reserve you need, confirm the hardware once and keep the installation instructions with your cart. Fleet can help match your battery, mounting and charging components before you order.