Can you convert your Club Car to lithium?
Yes—compatible 48V lead-acid Precedent, Tempo and Onward carts can use a matched Fleet 51.2V lithium conversion system. The key is matching the actual battery tray, controller and charging system. This guide covers early and later Precedents, Tempo and Onward differences, the Club Car charge receptacle and both 2-inch gauge mounting options.
A good lithium conversion makes the cart you already enjoy easier to own: no battery watering, a dedicated state-of-charge display and a charging system matched to the battery. Use the real installation photos and model comparison below to plan yours with confidence.
Precedent, Tempo and Onward: what changes?
Start with your serial/build label, a complete battery-bay photo and the original charger label. The Precedent tray change and the change from PowerDrive/OBC to ERIC charging are separate events. A model year alone does not identify every part on a cart that may have been modified.
| Model | What to identify | Installation difference |
|---|---|---|
| Early Precedent: 2004–2008.5 transition | Four 12V batteries around the center power panel. | Use the early-model mounting arrangement; retain panel, Tow/Run and harness access. A later BR4254 bracket is not automatically interchangeable. |
| Later Precedent | Later tray/rear controller arrangement; six 8V batteries are common. | Match the bracket to the actual tray. Check PowerDrive/OBC versus ERIC independently of the tray generation. |
| Tempo / Tempo Connect: 2018 onward | 48V lead-acid ERIC or factory-lithium system. | Preserve the reducer, USB, GPS and connected-equipment feeds. Factory lithium uses a different battery/control solution. |
| Onward: 2017 onward | Seat count, tray, standard/HP drivetrain and battery chemistry. | HP can be lead-acid or lithium. Verify controller current and compatibility; newer dash layouts change gauge access. |
The manual includes selection guidance across all Precedent model years and the Tempo and Onward families. Its installation sequence applies to compatible 48V lead-acid electric carts. Gas carts, factory-lithium replacements and 72V performance conversions need their own matched systems; a 72V product option is not permission to raise a stock 48V drivetrain to 76.8V.


Choose the Fleet kit for your Club Car
Buy the system for your exact tray and drivetrain, then choose capacity for your routine. A larger amp-hour rating adds stored energy; it does not establish higher top speed or authorize higher controller current.
| Kit | Current 48V-class choices | Before ordering |
|---|---|---|
| Early Precedent kit | 65Ah / 105Ah / 168Ah | Match the early center-panel tray. |
| Later Precedent kit | 65Ah / 105Ah / 210Ah | Check the bracket and charging system. |
| Tempo kit | 65Ah / 105Ah / 210Ah | Identify lead-acid versus factory lithium. |
| Onward kit | 105Ah / 168Ah / 210Ah | Check seating, tray and standard/HP drivetrain. |
At 51.2V nominal, 65Ah stores 3.33 kWh, 105Ah 5.38 kWh, 168Ah 8.60 kWh and 210Ah 10.75 kWh. These are nominal energy figures, not guaranteed range. Select 65Ah only for the stock motor/controller applications specified by Fleet. The 210Ah option uses two matched 105Ah packs in parallel.
Why choose a matched Fleet conversion?
- Less routine upkeep: no watering or lead-acid equalization.
- Useful battery information: a dedicated SOC gauge and supported battery monitoring.
- A familiar charging location: the matched Club Car AC receptacle feeds the onboard lithium charger.
- Help before and after installation: vehicle-specific planning, an illustrated owner manual and Fleet support.
Check the selected product for its current parts, options and warranty terms. Send Fleet your serial label and battery-bay photos if your cart has an aftermarket controller, a modified tray or an unclear model history.
Watch a real Fleet installation with Lakeside Buggies
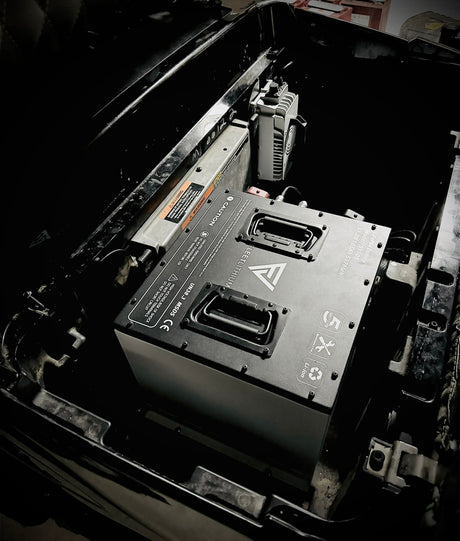
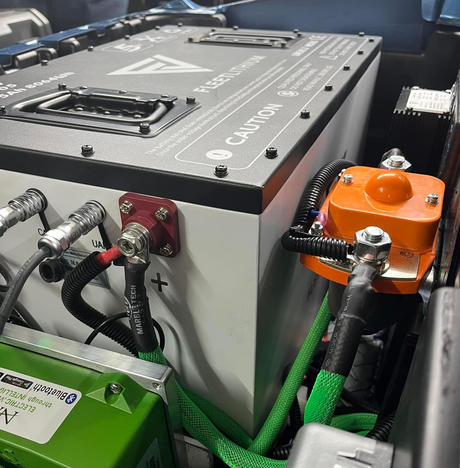
2020 Club Car Onward FLEET Lithium Battery Install DIY & Test Drive! follows a real Onward conversion. The photographs in this guide come from the original installation assets. The video is an Onward example; use the manual’s model-specific checks for early Precedent and Tempo differences. Current supplied parts and instructions take precedence over historical hardware or offers shown in the video.
Watch the installation on the Lakeside Buggies YouTube channel

What does a Club Car lithium installation involve?
1. Photograph, label and isolate
Park level, set the brake, select Neutral, remove the key, chock the wheels and unplug charging power. Photograph and label main cables, charge/control wiring and accessory taps. Place Tow/Run in TOW before cable work. Disconnect main negative, then positive; insulate loose ends and allow 90 seconds for the controller to discharge. Individual lead-acid batteries remain live after disconnection.
2. Remove the bank and prepare the tray
Use suitable lifting equipment and recycle the old batteries. Clean and dry the tray, repair corrosion and replace deteriorated cables. Trial fit the exact restraint and battery. Early Precedent requires clearance around the center power panel; later Precedent, Tempo and Onward require access to their actual controller and wiring arrangement. Check the seat and terminal covers before securing the pack.
3. Connect main power and accessories
With the battery OFF, connect the identified circuits using the approved harness, protection and specified torque. Connect positive first and negative last. Use the designed return conductor, not the frame. Confirmed 12V lights, USB, radios and connected equipment need a correctly rated converter; do not move old battery taps onto full lithium pack voltage.
4. Install the charger, receptacle and gauge
Mount the matched onboard charger where it is protected and ventilated. Complete the AC inlet, direct DC charging and vehicle control interface described below. Fit the SOC display flush in the dash or in its included mount. Protect all wiring from sharp edges, pedals, steering and seat hinges.
5. Commission before normal use
Check restraint, polarity, torque, covers and control wiring before power-up. Verify the gauge, accessories, battery faults and charge interlock. Complete a normal full charge, disconnect AC and conduct a walking-speed drive in a clear area. Reinspect the installation and record the checks. On a 210Ah system, confirm both packs charge and contribute.
OBC, ERIC and the Club Car charge receptacle
The charging path is AC supply → Fleet Club Car AC inlet → onboard lithium charger → Fleet battery. The CH5618, where supplied, provides 58.4V at 18A. Its DC output connects through the matched charging harness independently of the original OBC-controlled charging power path.


PowerDrive/OBC: identify the old charging branch and preserve shared vehicle-control wiring unless fitting the matched OBC-removal/interface harness. ERIC: there is no legacy OBC to bypass, but the charger-plug interlock still matters. Replacing a DC socket with an AC inlet does not by itself preserve drive inhibition.
The Fleet Club Car replacement receptacle is a 120V AC inlet. Fit it to the matching body opening and connect its inside pigtail to the charger AC input. Never connect AC blades to battery terminals or transfer an old DC-socket jumper to the AC inlet. Retire the original lead-acid charger and verify the control interface for the installed controller and charger.
Two ways to mount your Fleet 2-inch gauge

Flush in the dash with a 2-inch hole saw
Choose a visible, flat location and access both sides of the dash. Confirm the actual 2-inch (50.8 mm) cutout, gauge depth, retainer and cable clearance before cutting. Move wiring away, support the panel, cut squarely, deburr and remove all chips. Fit the gauge from the front and tighten its retainer without distorting the panel.
Use the included 2-inch gauge mount
Trial fit the gauge in the supplied mount and choose a firm surface clear of controls. Check behind any fastener holes, secure the mount and fit the gauge with the supplied hardware. This avoids a large dash cutout; the mount may still require fastener holes.
For either option, use the display cable and DISPLAY / CAN connection specified for the actual battery revision. Do not use a different communication port or apply pack voltage to the display cable. Verify the gauge before closing the dash.
Keep it with your Club Car
Download the Precedent, Tempo & Onward installation manual
Real installation photos, original wiring diagrams, model differences, both gauge mounts, the charge receptacle, commissioning, troubleshooting and your fillable installation record.
Revision 2.0 • 12 pages • 20 fillable fields • PDF, approximately 2.4 MB.
Club Car lithium conversion FAQs
Can I convert a Club Car Precedent, Tempo or Onward to lithium?
Yes. Compatible factory 48V lead-acid versions can use a matched Fleet 51.2V lithium conversion system. Select the correct tray restraint, battery capacity, lithium charger and vehicle control interface. Gas, factory-lithium and 72V systems require a different matched solution.
Does this cover early 2004–2008 Precedents?
Yes. The manual distinguishes the early center-panel, four-12V layout from the later tray introduced around the 2008.5 transition. Use the early-model mounting parts and preserve the power panel and harness. Do not assume a later BR4254 bracket fits an early cart.
Does my Club Car need an OBC bypass?
Identify the actual PowerDrive/OBC or ERIC system. The Fleet lithium charger charges directly through the approved battery harness and does not use the old OBC for charging regulation. Preserve shared control wiring or use the matched OBC interface. ERIC has no legacy OBC to bypass; its charging interlock still needs the correct interface.
Can I use the original Club Car charger?
Use the matched lithium charger supplied for the Fleet battery. The original lead-acid PowerDrive or ERIC charger is not the charger for this conversion. A CH5618, where supplied, provides 58.4V at 18A.
How does the replacement Club Car charge receptacle work?
The Fleet 120V AC receptacle fits the matched Precedent, Tempo or Onward body opening. Its inside pigtail supplies the onboard charger AC input. The charger DC output connects to the battery; AC inlet blades never connect to battery terminals. The inlet alone does not create a drive interlock.
How do I mount the 2-inch Fleet gauge?
Choose a flush dash installation using a 2-inch hole saw after confirming the actual gauge cutout and rear clearance, or use the included 2-inch gauge mount. Dash shapes vary. Protect the harness and use the DISPLAY / CAN port specified for your battery revision.
Is every Onward HP a factory-lithium cart?
No. Onward HP versions can be lead-acid or lithium. Identify the battery chemistry, controller and drivetrain from their labels. Match current demand and the battery/control interface before choosing a conversion; HP is not enough information by itself.
Will my lights, USB and Tempo Connect equipment still work?
Preserve the original accessory controls and use a properly rated, fused DC-DC converter for confirmed 12V loads. It must accept the full 58.4V charging voltage and support the combined load. Never reconnect a former 8V or 12V battery tap to full pack voltage.
Is the 210Ah option a higher-voltage conversion?
No. Two matched 51.2V 105Ah packs in parallel provide 210Ah at the same nominal voltage. Use the approved matching, harness, protection and restraint arrangement. Never wire these packs in series.
How long will installation and charging take?
Installation depends on tray condition, control wiring, receptacle access and gauge mounting; a universal time promise is unreliable. At 18A, ideal empty-to-full planning times are 3.6 hours for 65Ah, 5.8 for 105Ah, 9.3 for 168Ah and 11.7 for 210Ah. Temperature, tapering and balancing can extend charging.
Build the right system for your Club Car
Choose capacity for your routine and mounting parts for your actual cart. Fleet can help you match the kit before you take the old batteries out.