72V ELECTRIC UTV INSTALLATION SERIES
Keep your electric UTV working, with less battery upkeep. Here is how to plan a Fleet Lithium conversion for Tracker EV / EV iS, Textron Prowler EV / EV iS and Bad Boy Recoil / Recoil iS—with real installation photos, the Lakeside Buggies video and a downloadable manual.
Can these 72V UTVs be converted to lithium?
Yes. Compatible factory 72V lead-acid models can use a matched Fleet 76.8V lithium conversion kit. The complete system includes the correct battery capacity, restraint, cables, lithium charger, AC inlet and battery gauge. Match your actual tray, controller and 12V accessories before removing the old bank.
One electrical family, different installation details
These names cover more than one tray, suspension and braking configuration. Read your model/serial label and photograph the controller and complete battery bank. A Recoil badge, a Prowler body or a model year alone is not enough to select the wiring route.
| Vehicle | What to check |
|---|---|
| Tracker EV / EV iS | Factory 72V system, controller/braking arrangement and capacity-specific restraint. The 168Ah option uses the larger-pack bracket kit. |
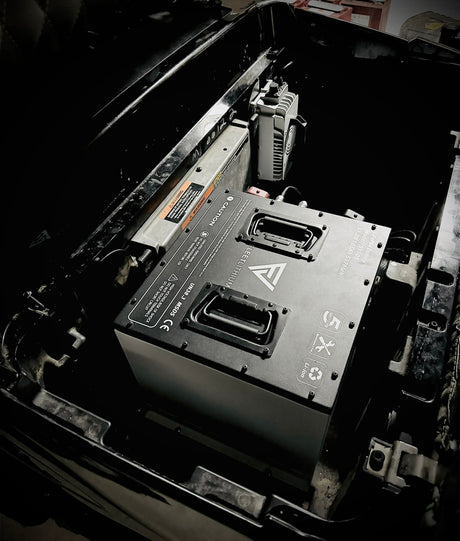
| Textron Prowler EV / EV iS | The real video shows a 105Ah installation with stacked lead-acid trays, rear controller access and a round factory gauge opening. |
| Bad Boy Recoil / Recoil iS | Use the Recoil restraint specified on your order. Early OEM Recoil iS documentation shows nine 8V batteries; do not assume the six-12V Prowler layout. |
Check the voltage first: this is not the procedure for a gas Prowler, hybrid Ambush, 48V Bad Boy or 48V Polaris Ranger EV. For Recoil Crew, Instinct or a modified vehicle, send Fleet the serial label, tray and controller details before selecting the kit.
105Ah or 168Ah: choose reserve, then confirm fit
A lithium conversion removes the battery-watering and lead-acid equalization routine. A dedicated SOC gauge helps you see the battery’s remaining charge. Choose capacity for how you use the vehicle—property work, hunting access, hills, passengers and trip length.
| Fleet option | Nominal energy | Installation planning |
|---|---|---|
| 76.8V 105Ah | 8.06 kWh | Uses the factory tray on matched Tracker/Prowler applications. Still requires proper restraint. |
| 76.8V 168Ah | 12.90 kWh | More energy reserve; match the larger battery to its supplied mounting kit. |
Nominal energy is voltage × amp-hours. It is not a promised driving range. Load, terrain, tires, temperature and driving style affect range; OEM payload and towing ratings stay the same.

Watch the real Prowler EV lithium installation
Lakeside Buggies demonstrates the 105Ah conversion, including the controller cables, charger and dash gauge. Use the written manual alongside the video for the model differences and final checks.
2:47 — controller wiring · 5:43 — battery connections · 6:24 — gauge installation · 8:09 — final installation
Two useful video details: the early trial fit uses an empty display case, and the corroded metal removal is repair work on that vehicle. Neither is a reason to lift a real pack by hand or cut sound structural supports. Reduced battery weight does not increase the vehicle’s rated payload.
What the installation involves

1. Secure the vehicle and remove the complete old bank
Park level, select Neutral, apply the parking brake, remove the key, chock the wheels and unplug charging power. Follow the actual model’s isolation procedure; set RUN–MAINTENANCE/STORAGE to maintenance where fitted. Disconnect main negative first, then positive, and insulate the loose ends. Use insulated tools and suitable lifting equipment. Remove the stacked trays in sequence and repair damaged supports before fitting lithium.
2. Fit the right restraint
On a matched Tracker/Prowler, the 105Ah pack fits the factory tray; 168Ah uses the separate larger-pack bracket. Recoil uses its own supplied restraint. Trial fit with the battery OFF, check seat and terminal clearance, and secure the pack so it cannot slide, rock or lift. Inspect behind any specified fastener holes before drilling.
3. Preserve the dual-controller wiring
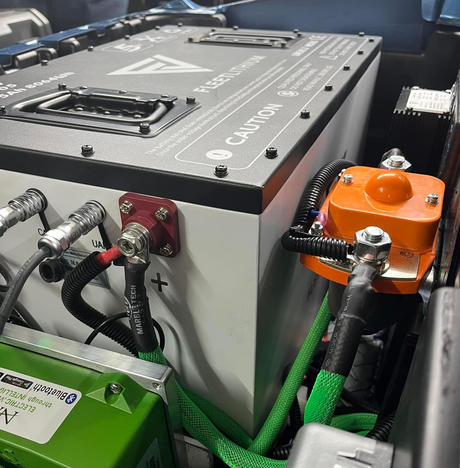
The filmed Prowler replaces the old battery return with the matched ring-lug cable at the controller B− connection, retaining the intercontroller link. Main positive returns to the original protected, battery-side large contactor terminal. Do not identify a terminal by left/right position, move motor phase cables or bridge safety circuits. Use the specified cable, protection, lug order and torque; connect positive first and negative last with the pack OFF.
4. Install the matched charger and AC inlet
The path is grounded AC supply → AC inlet → lithium charger → Fleet battery. The current kit lists CH8713, with an 87.6V / 13A DC output, and AC0219 where supplied. Mount the charger securely with ventilation and protect the inlet pigtail. Its DC output connects through the matched harness to battery positive and negative. Retire the original lead-acid charger and preserve the model’s correct charging inhibit interface; an AC inlet alone does not provide that function.
5. Fit the SOC gauge
The filmed Prowler accepts the new gauge in the existing round opening. Gently release the dash panel and old gauge retainers, fit the new gauge and secure its supplied bracket. If your dash differs, choose a verified 2-inch (50.8 mm) flush cutout or the included 2-inch gauge mount. Check both sides before cutting. Route the matched cable to the designated Fleet battery gauge port; do not reuse unidentified old gauge wires.
6. Charge, test and record
Check restraint, polarity, torque, covers, both controllers, accessories and gauge before power-up. Verify normal charging and the installed charge-inhibit arrangement. Disconnect and stow AC before a walking-speed test on clear, level ground. Check service and parking brakes and the vehicle’s intended drive modes. Reinspect after the first short drive and save the installation record.
Regenerative braking returns energy to the pack. A full battery has less capacity to accept it, so confirm the matched battery/controller setup and avoid a steep downhill commissioning run. Stop for overvoltage or BMS trips; do not raise protection limits to hide a fault.
Keep 12V accessories and winches on the right supply
Never connect a 12V accessory or winch directly to the 76.8V traction pack. An old tap from one lead-acid battery must be replaced with a correctly rated supply. A reducer must accept the 87.6V full-charge voltage and supply the connected load through the specified protection.
The current Recoil bundle lists a 12V reducer; the Tracker/Prowler bundle does not. Winches can demand far more current than lights and USB outlets. Use a converter rated for the actual winch, including peak demand, or a secured auxiliary 12V battery with a suitable charging system. A standard accessory reducer is not automatically a winch supply.
KEEP IT WITH YOUR UTV
Your illustrated installation manual
Model and capacity differences, real installation photos, original wiring diagrams, charger and gauge fitting, 12V accessories, commissioning and a fillable installation record.
Revision 1.0 · 10 pages · PDF
Tracker, Prowler and Recoil conversion FAQs
Can I convert a Tracker EV, Prowler EV or Recoil iS to lithium?
Yes, compatible factory 72V lead-acid electric versions can use a matched Fleet 76.8V nominal lithium system. Confirm the model/serial label, controller, tray and supplied restraint. This guide does not cover gas Prowlers, hybrid Ambush models or 48V Bad Boy and Polaris Ranger EV systems.
Why does a 72V vehicle use a 76.8V lithium battery?
72V describes the original lead-acid system class. The matched Fleet lithium pack is 76.8V nominal and uses an 87.6V lithium charger. Battery chemistry changes the nominal voltage; this is not permission to install the pack in a 48V vehicle.
Should I choose 105Ah or 168Ah?
105Ah provides about 8.06 kWh nominal energy; 168Ah provides about 12.90 kWh. Choose reserve for your terrain, load and trip length, then confirm fit. On matched Tracker/Prowler models, 105Ah uses the factory tray while 168Ah uses the separate larger-pack bracket. Recoil uses its model-specific restraint.
Does every Recoil have six 12V batteries?
No. Early OEM Recoil iS documentation specifies nine 8V batteries, while the Prowler example uses a different layout. Both are 72V systems. Identify your actual bank and complete-pack terminals instead of copying another model’s cable positions.
Do I need to replace the main solenoid or both controllers?
A compatible, serviceable contactor and stock controllers are not automatically replaced. The filmed installation replaces the battery-to-controller return and battery-to-contactor positive cable, retaining the intercontroller link and existing control circuits. Confirm modified systems with Fleet before installation.
How are the charger and gauge connected?
The matched charger receives AC through the supplied inlet; its DC output connects through the charging harness to battery positive and negative. CH8713 supplies 87.6V at 13A where included. The gauge uses its matched cable and designated Fleet battery port, not unidentified old gauge wires.
Can I reuse the factory gauge opening?
The filmed Prowler accepts the Fleet gauge in its original round opening. If yours differs, verify fit before choosing a 2-inch dash cutout or the included 2-inch gauge mount. Check behind every cut or fastener location.
Is a 12V reducer included, and will it run my winch?
The current Recoil bundle lists a 12V reducer; the Tracker/Prowler bundle does not. A standard accessory reducer is not automatically suitable for a winch. Match converter input to the 87.6V full-charge voltage and output to the actual load, including winch peak demand. Never connect a 12V winch directly to the traction pack.
Can I keep my old lead-acid charger?
Use the matched lithium charger supplied for this system. Do not reuse the original lead-acid charge program. Preserve the correct vehicle charge-inhibit interface and unplug the AC cord before driving.
Does this conversion increase my payload or towing limit?
No. Retain the OEM payload, towing, tire and terrain limits. Range varies with use, and reduced battery weight does not change the published vehicle ratings.
Get the right Fleet system for your UTV
Start with the vehicle, choose your reserve and match the complete installation. Fleet can help confirm the kit before you take the old bank out.